I started to paint my new Kerr & King desert terrain yesterday. I decided to try out colour schemes on the smallest of the 10mm range adobes so I wouldn't make a mess of any of the larger buildings where bad colour choices would be more apparent. I had two schemes in mind. The first was a spray of white primer with a coat of Army Painter Strong dip and then white dry brushing to bring out the details. The second was to spray the model with Army Painter Desert Yellow spray primer and then just dry brush white. (The colours in the photos are darker than real life.)
 |
| White & Desert Yellow primers |
After I'd primed the models I painted the doors and windows and also the exposed brick work. I was going to try red brick but I thought that wasn't too appropriate for the desert so I went with a beige colour for a sun-dried effect.
 |
| Doors & windows done. |
 |
| Exposed brickwork |
Next came the dip on the white model which went on quick and easy. However the dry brushing on the sand coloured model took much longer than I expected. I was having to keep a lot more paint on the brush than I normally would. I also realised I should have waited to paint the doors and windows as the dry brushing meant they would need a second coat.
 |
| Dip done & dry brushing completed |
The dipped model is actually lighter in real life but does have a dirtier look. The yellow isn't as strong on the other model either but it looks a bit 2-tone rather than having the graduated effect of the dipped model.
 |
| Doors & windows repainted |
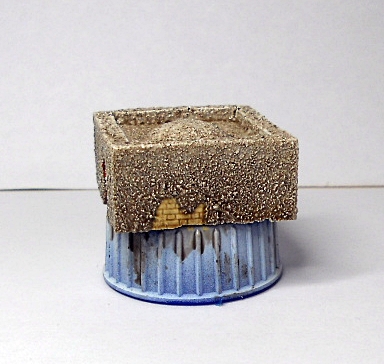
I felt the brickwork was too pale on the dry brushed model so I gave it a sepia wash which had the bonus of picking out some detail..
 |
| Sepia wash to the brickwork |
Once the dip had dried I did a light dry brush white to pick out some details.
 |
| The exposed brickwork picked out by the dip. |
 |
| The white dry brushing completed |
Here are a couple of shots of the finished models. The dipped model is still dark and dirty but looks ok in normal light. The sand based model is ok but takes much longer to dry brush.


 |
| The 10mm scale adobes with a 105mm cannon |
Very cool, though even if it takes longer I like the drybrushed one.. as it is more sand colored? The dipped looks more dirty though, and en mass will look the business.. looking forward to seeing more of them done up.
ReplyDeleteLooking good, and I agree with Mr. Lee the dry brush one looks nicer, so I would go with that option. I always think it's a gooe idea to spend a bit more time on terrian as I think it's the most important part of the look of any wargame.
ReplyDelete