Saturday 29 June 2013

My 'By Fire & Sword' rulebook has arrived


So my copy of 'By Fire & Sword' arrived this morning from NorthStar and first impressions are good. I'll be doing a more in depth review next week but here's my thoughts so far. 

The book is indeed a weighty tome weighing in at nearly 2 Kg or 4.5 pounds. The hardback binding looks sturdy and the pages are fairly heavy duty so should stand up to wear and tear. The text is a decent size and it's lavishly sprinkled with photos and illustrations. There is an index at the back but strangely many pages don't have page numbers on them. The rules are all on numbered pages but things like the army lists have no page numbers. It probably won't be a problem but it is a little unusual.

There's a nice section at the start that explains some of the basics and gives a guide on the different approaches to painting miniatures which seems useful to both beginners and more experienced painters. The rules comprise about 100 pages of the total 408 pages and are well set out with lots of examples and diagrams. The rest of the book comprises the scenarios and detailed army lists and history of the various combatants. There is also a quick reference section at the back of the book although I'm sure someone will produce a pdf version soon if they haven't already done so.

The rules aren't cheap at £38.50 plus p&p but you get a lot for your money. They could have produced a softback version containing just the rules and scenarios but, if you're anything like me you won't know much about this period and it's armies. So you would have probably bought various reference books/painting guides to help you out which would probably take you well past £38.50. 

Hopefully I'll have a more detailled review early next week although 408 pages may take me a while to get through.

Saturday 22 June 2013

Assembling my Warlord Games Brits

Having decided on the weapon mix for my Bolt Action Brits it's now time to assemble the figures. This is the part I wasn't looking forward to doing. The figures are lovely sculpts with no flash or mould lines but the fact that they have lots of options and accessories means there are lots of parts to assemble.

I decided to start with a rifleman with a backpack and no other options. But this still meant assembling eight separate parts. These being the base, right arm, left arm. rifle, head, helmet and backpack all attached to the body. If I'd chosen to start with a kneeling figure the body would be further split into the torso and two separate legs as well.

Getting the order of assembly right makes a big difference. I decided to start with the right arm as I could then add the weapon which would make positioning the left arm easier. With all the weapon and arm options it's important to check carefully on the instruction sheet which parts you need. It's also useful to check where your chosen right arm goes by referring to the illustrations. Having big fingers makes the assembly very fiddly and it was quite tricky to get the arm positioned correctly. Once the glue was dry I added the rifle which wasn't too tricky to do. Attaching the left arm was much easier as I had two reference points but The arm didn't fit the body as well as I would have liked as the position of the right arm was a little out skewing everything else.

Arms and rifle attached to the body

Next I attached the head which has a nice recess to making fitting easier but it still took a few goes to get a position I was happy with as my fingers obscured the head as i was holding it into position. By contrast the helmet was a doddle, fitting quickly and easily as were the backpack and base.

Front view of the assembled model

Rear view of the assembled model
Overall I'd rather have one piece models even if the quality was poorer. I'm a wargamer not a modeller and from three feet away most of the detail is lost anyway. I can see the appeal of these figures for people who want a variety of options and poses but for me they're just a pain. One thing that would help are lugs and sockets on the arms/torso to position the arms as they are the trickiest pieces. One final note, I've seen people say that they broke some weapons removing them from the sprue but using snips I've had no problems.

Friday 21 June 2013

'Chain of Command' Playthrough

Yesterday TooFatLardies hosted a live playthrough of their upcoming WW2 skirmish rules 'Chain of Command' on their blog. It was really interesting to read through the action as it happened and it also gave a greater insight into how the rules worked. The playthrough can be found here. But here's a brief snippet of the action:

Chain of Command. A Day of Action

Right chaps, we will be updating this thread throughout the day as we work our way through the Phases and Turns. Feel free to add comments and ask questions.
Prelims
We began the Patrol Phase yesterday with a roll to see our Force Morale and, with this particular scenario, who went first. Rich won that and as a result he gets the first Phase of play in the game itself. As it happens both sides threw 6 for their morale so begin the game brimming with confidence with matching Force Moral levels of 11.
Phase 1. German. The Command Dice are 44431. Not a great combination for me as the Hun. I have only my Platoon commander who can be activates on a 4 and I want him back commanding his O Group off table for now. So only a 3 and 1 to be used. Mindful of my plan to find good dominating positions for my armour I bring on the Puma and, being a wheeled vehicle I get to move that immediately. It advances to the T junction. No 6’s rolled means that the next Phase is British.


Phase 2. British. My Command Dice are 64331. The single 6 means that Rich will get the next Phase. I am keen to push on my armour with infantry ahead of them to protect them from the damned bosche bazooka men. I deploy one section to the T junction just beyond the village and bring on Sherman 1 on the road in the village itself. As it is a tank it just deploys, it doesn’t move in this Phase.


The full playthrough is well worth the read. The more I see of these rules the more I like them. Sadly they don't come out until August.

Tuesday 18 June 2013

Bolt Action: Building my British Infantry at 500pts

Now I have my figures, thanks Tamsin, I need to work out my force composition. Normally I build my forces on paper and then buy the figures I need but this time I need to make the figures I won fit a force.


My first thought was to make all the 'extras' from the box (PIATs, mortars, snipers, lmgs etc) to maximise the points and then use what's left as my troops. But on reflection I decided that was a bad move as the core of the force should be the infantry. So I looked at what was compulsory and then what would be good additions.

So I have to have an officer and two squads, each of five men minimum, I also get a free Forward Artillery Observer as the British 'perk'. This uses twelve of the twenty five figures in the box. I thought about giving them some anti-tank capability with the PIAT but discarded that idea. It's unlikely that I'll be facing much in the way of armour at 500 pts plus the PIAT only has a range of twelve inches limiting it's effectiveness.

The next thing I looked at was artillery support. Getting a free FAO is nice but you only get to call in one barrage which may or may not be effective. So I decided to include the 2" mortar. It's not particularly powerful but it gives your opponent something else to think about plus some well timed smoke may make the difference between success and failure for an assault. This brings my running total to fourteen figures used.

Like most wargamers I have a thing for snipers so adding a sniper team was a no-brainer. Having them sitting on an objective picking off advancing NCO's can really stall an enemy advance as well. Which brings my total to sixteen figures.

My force is a little short on firepower so I decided to add a Bren gun to each of my squads. There is some discussion as to whether LMG's are worth the points but I like the longer range and extra firepower they bring. This leaves me with seven figures spare.

So I've added three infantry to each squad making them nine man squads. I decided to use the last figure as a Medic because it gives me an extra dice and in a small force being able to cancel out a casualty could be crucial.

Next I had to decide on the various options like regular, veteran, weapon choice etc. To do this I used the army builder spreadsheet from BoltAction.net. This gave me the following force:

Veteran 1st Lieutenant
Medic (Veteran)
Forward Artillery Observer (Regular)
1st Squad: NCO with Sten, LMG, 7 Riflemen (Veteran)
2nd Squad: NCO with Sten, LMG, 7 Riflemen (Veteran)
Regular Light Mortar
Veteran Sniper Team

This works out at exactly 500 pts and uses all the figures in the box. It's far from being the best 500 pt force you could build for the Brits but it has the benefit of being free. Now I've decided on my force it's on to the hard part, assembling the figures. I think plastic miniatures are the way to go for lots of reasons but I hate the fiddly assembly. This is my first set from Warlord so I'm interested in seeing how they go together.

Monday 17 June 2013

First Look: Chain of Command by Too Fat Lardies

While researching the best mix for my Bolt Action Brits I came across a mention of another set of WW2 skirmish rules that are coming out later this year, 'Chain of Command' from Too Fat Lardies. They seemed to be generating some buzz so I decided to check them out. I noticed they'd done a set of videos explaining the rules and a play through of a game so I've linked them all here with my thoughts.


The forces seem to be about the same size as Bolt Action so I should be able to use my figures for both games with just a little tweaking. The 'Patrol' phase sounds interesting and provides some nice pre-game tactics to add flavour to the game. So far so good.


Not too clear what the benefit of ending a turn is at this stage, but it becomes slightly clearer in later videos. The use of dice to activate troops is nothing new but does provide command & control problems for you to solve. It's not too clear what the benefits of having a 'chain of command' dice are, I guess you need to play a few games to fully understand why moving a jump off point or ending a turn might be important. The use of sixes to adjust the flow of phases again requires you to think a bit more carefully about what you intend to do. What if my opponent rolls two sixes and gets to move twice, am I too exposed. Alternatively if I roll two sixes am I in a position to take advantage of a double move. Still seems an interesting rule set with no drawbacks so far.


I like the option to move and fire or move further but with less options, that's fairly standard in lots of rules. However I don't like the rolling to see how far you can move. It just seems like a random effect for randomness sake. I understand if you're moving through bad terrain the distance you could move might be affected and that effect could vary depending on how bad the terrain turned out to be. But if you're moving along a road with no enemy anywhere near you why would your move be so variable? If I get these rules I may house rule to remove the randomness or maybe make it 3" minimum move plus a D3 or something like that. I like the ranges of the weapons but not sure about the combat mechanisms, they seem a little simplistic. The 'shock' mechanism and morale system isn't really covered in enough detail here or in the later videos to allow me to make a decision on it. A couple of things here that make me think I might stick with Bolt Action but we'll see.


Some fuller explanations of things here. I like the way that the Germans can come in on the Jump Off points giving them a sort of ambush. The rallying is a nice feature, but I would like to know more about 'Shock' and it's effects. I'd also have prefered to see more of the actual combat resolution than just the end results.


More of the same here nothing really new covered.


I like the use of smoke and that you can use grenades. The fact that the Germans got too spread out to be able to use a lot of their dice was interesting and makes you consider the command and control implications of your tactics a lot more than you see in other games. But I'd like to have seen more about morale and shock.

I like the idea of using videos to explain your rule basics and show how the game plays, so kudos to TFL for that. But I have a number of questions, such as do the rules include scenarios; are there national differences for the various troop types; is there a campaign structure; do the rules include comprehensive army lists or are we going to have to buy supplements etc. Overall the rules seem to have some interesting ideas and offer a different tactical challenge to Bolt Action. Not sure if I'll buy a set, it depends on the price, but worth another look once they come out, which is expected to be sometime in August.

Thursday 13 June 2013

Quick Review: Warlord Games British Infantry

Having won these in Tamsin's giveaway I thought it was about time I gave them a quick review. The box contains enough parts to make twenty five 28mm figures with various weapon options. The quality of the casting is excellent with no flash and very little in the way of mould lines. You get lots of options and everything you need to assemble a 500+ points force for Bolt Action.

The front of the box has nice action shots reminiscent of the old "Commando" books I used to love as a kid.


The back of the box gives you details of some of the weapon options you get as well as some pictures of the painted up models.


You get five figure sprues each containing four standing figures and one kneeling figure. In addition there are eight head options on each sprue as well as six different helmets to give your figures some variety. There are also six back packs with options like tea mugs and spades. The twenty two arms on the sprue are related to specific weapon options, I'll talk about these later. Each figure is also supplied with a 25mm plastic base.


As well as the figure sprues you also get three weapon sprues. These contain eight .303 rifles (four with bayonets and one with a sniper scope), two Sten guns, two Thompsons, three pistols, one Bren gun, one PIAT with ammunition, one 2" mortar, as well as various grenades, shovels, a pickaxe, ammo packs and even a pair of binoculars. So lots of options on how you want to equip your figures.


There is also a sheet of transfers with shoulder patches, rank stripes and arm bands for medics and MP's. I've never come across transfers for figures before but it seems like a good idea. I'm not sure how it will work out in practice though as you may need to use transfer softener to get them to sit right. I'll give them a try on the NCOs and see how they look. 


Lastly you get a double sided instruction sheet. One side identifies the components on the weapon sprues while the other covers the figure sprues. This is a vital piece of information as it shows which arms have to go with which weapons. I would strongly recommend that you don't remove everything from the sprue in one go as trying to identify the various arms later would be a nightmare.


I'll look at how well they go together once I've decided what options I want to build for my Bolt Action British force. However they do look like they will be quite a bit more fiddly to assemble with all the various parts than my PSC 28mm Russians. So what do I think about them? Well I'd have to give them a 10/10 as I can't find anything to criticise, but this may change once I try to assemble them.

Saturday 1 June 2013

Bovington Tank Museum Photos

Although the entry fee for the Battlegroup South wargames show at Bovington is expensive, you do get a pass which gives you a years free entry to the museum. So on Friday I decided to take advantage of my pass and pop over to have a look around and take some photos.

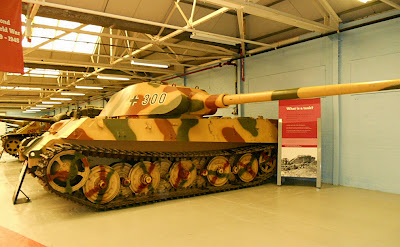
I'd forgotten it was half term so the museum was very busy but I still managed to avoid getting hordes of kids appearing in every picture. The star of the show for me is the Tiger II because it is just so massive in the flesh. You don't get any idea of the size of these things from models or photos. But to stand in front of one and imagine it's advancing towards you with all guns blazing is just terrifying. This is one photo I would have liked someone to be standing near the tank to give you a size comparison. Although it doesn't look it, it must be six feet from the floor to the top of the deck


Another thing I found interesting was some of the camo patterns. The Somua shown below is pretty typical of what I think of as a French camo pattern, lots of bright colours. 


So I was surprised when I saw this Char B1 in the next hall. It's camo is very dull. A dark brown overlaid with patches of black.


And I was even more surprised by this maroon and sand camo pattern on the Panther. I guess that's why it's good to visit places like Bovington. Nothing like seeing the real thing to put things into context.


So on with the rest of the photos:

A Vickers Light Tank

Mk IIa Light Tank


A Matilda

Daimler armoured car

A Hetzer, I was surprised by how small it was.

Tiger II


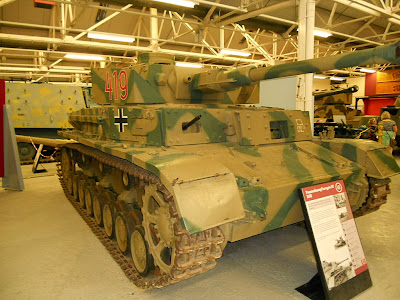
Panzer IV

Tetrach in its air drop container

Stug III with interesting log 'side skirts'


Stuart

Staghound

Comet

Engine compartment and interior of a JagdTiger

JagdTiger

If you painted up a model like this people would criticise your painting skills! It just goes to show modellers can get too precious about how their tanks look. That being said i don't think I could bring myself to paint one like this!

Battle of the Bulge camo Greyhound and M10

KV 1


An SU 100 in Iraqi colours

The museum also has lots of informative static displays like this section through a Centurion tank

A Firefly and Churchill

Renault FT 17


A tiny Vickers light tank

A Matilda with an interesting camo pattern which really does break up its outline.

A colourful Lee/Grant

An interior shot of the Lee/grant

A Firefly

Lastly a Sherman DD

You may also like:

Related Posts Plugin for WordPress, Blogger...