Saturday, 30 November 2013

Quick Review: Deadzone Marauder Ripper Suits

Today's random pick is two Ripper Suits and a Goblin sniper for the Marauders faction. All the minis come packed as shown below with no indication of what the models are or any instructions of how the pieces go together.

 
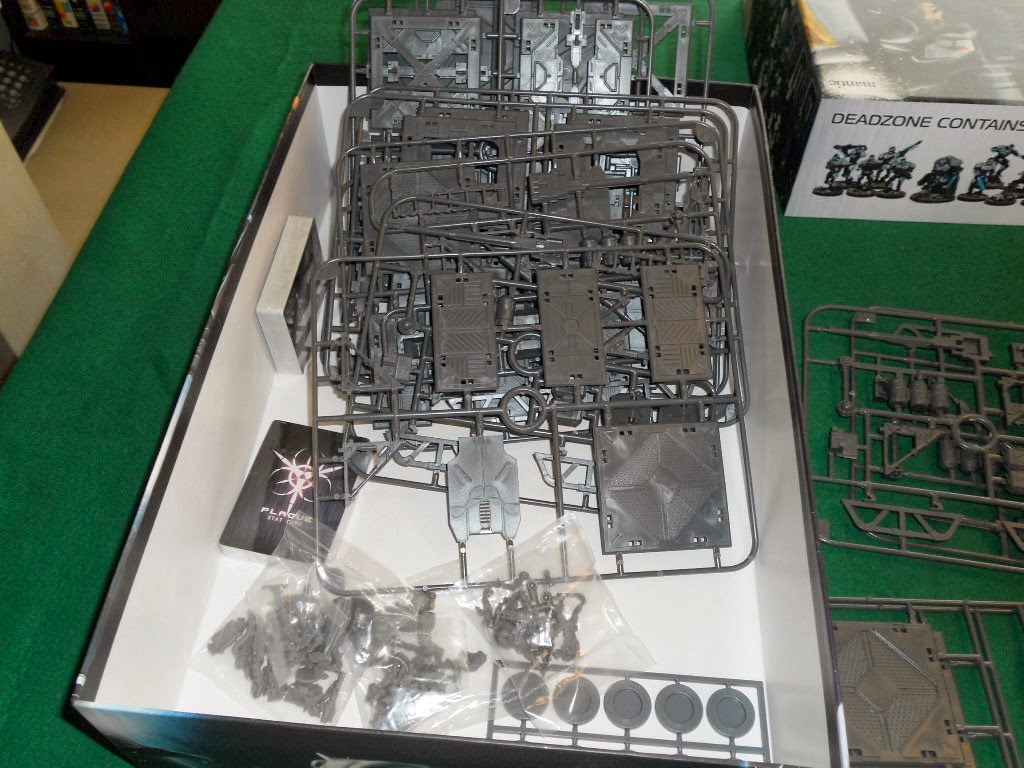
Here's all the pieces from the pack. Again hardly any visible mould lines but I did find a little bit of flash on the legs of the Ripper Suit models but it's not very noticeable.

 
Here's all the parts allocated to the various models. Again with no instructions it was hard to work out what went with what as there seemed to be spare pieces. So I found the models in the rulebook but couldn't find a clear shot of the close combat Ripper. The close combat Ripper has two saws and looking at the model it was obvious you could only fit one of them. So I was worried that picking one of them one would affect its points cost or combat ability. I had a flick through the rulebook and couldn't find anything about points or weapon choice affecting combat so I decided to have a look at the cards for this faction.
 
Each faction has it's own card deck. This deck has three types of card Mission cards, Battle cards and Stat cards. As you'd expect the mission cards tell you what you need to do to win but they also give you deployment zones. The Battle cards are used during the game and do things like giving you an a bonus in combat etc. The Stat cards though not only give you the stats for the model with their weapons but also have a picture of the model. I'll do a fuller look at the cards and rules once I've assembling the figures.
 
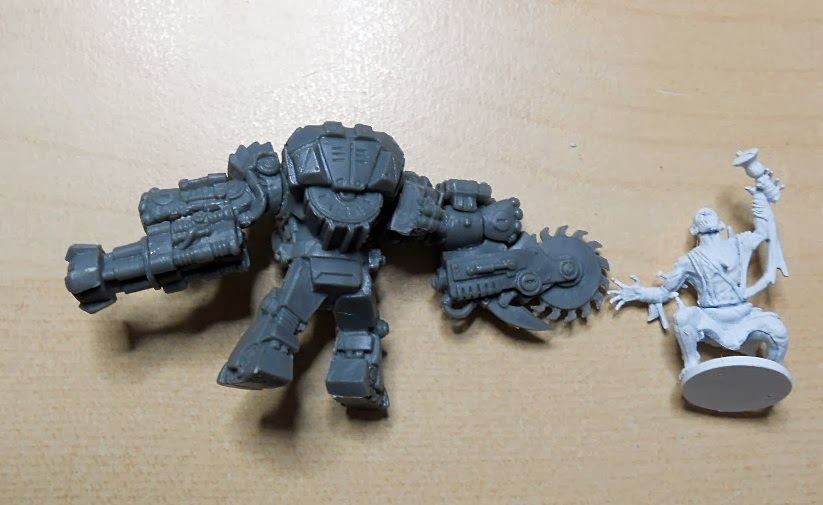
So looking at the stat card for the close combat ripper suit I can see that it doesn't matter which Saw I use as it's just cosmetic.

 
So on to the assembly of the models. The first thing to say is clear your work area of everything except the bits you need for that particular model as it's easy to pick up the wrong part by mistake. I was assembling parts for both models while the glue dried on one part and ended up gluing the wrong arm/weapon combo. Luckily I spotted the mistake before the glue set. Next thing is that the parts don't fit together well. I had to trim some pieces and even then there wasn't a perfect flush fit. I'm not saying the finished model looks bad, in fact I love how they look, just that you need to be aware that you'll have to do some prep work to improve the fit.

 
Dry fit all the pieces so you know where everything goes. This is particularly true for the chain gun as the ammo belt needs to be positioned correctly to make it line up well.

 
There are  alternate parts like the chainsaws and heads plus there are flavour pieces like the mini radar dish you can add to add to customise the finished model. One part that had me confused was the one shown above the goblin in the photo below. The close combat ripper has a hydraulic ram on his left arm and I worked out later that it was an alternate part that showed the ram retracted.
 
The last model in the pack is the Goblin Sniper. Easy to assemble as you just have to glue the head into place. However on my model the gun barrel was slightly bent but that's an easy fix.

 
The finished models with a Mantic ghoul for size comparison. Also included in the box are some 40mm bases to mount these on.


The pictures don't really give you a true impression of the size of the finished models. These Ripper Suits look massive, bristling with all kinds of weapons. I was going to go with Plague as my main faction but after building these I'm going Marauder all the way.
 
Tune in tomorrow for the next random pack.

Friday, 29 November 2013

Quick Review: Deadzone Rebs Faction minis

Each day for the next couple of weeks I'm going to be randomly picking a pack of figures from my Kickstarter box, assembling them and then giving my thoughts on the models and how they went together. First up is what turned out to be a couple of minis from the Rebs faction.

All the minis come packed as shown below with no indication of what the models are or any instructions of how the pieces go together.

 
The first thing to say is that there is no flash anywhere on the models and the mould lines are hardly noticeable. The loose pieces have been roughly cut off a sprue and will need trimming, more on this later.

 
The parts on the small sprue were easy to remove with no breakages, however on a couple of the parts the sprue was connected near where the part connected to the main body of the model and they have to be trimmed carefully otherwise assembly can be more tricky than necessary.

 
The parts generally have lugs and sockets of matching shapes to help with assembly. Although where some of them fit isn't immediately obvious. As you'll see in the pictures of the finished models one of them has legs where the arms would usually be and vice versa. After a bit of puzzling over how these went together I had a look for pictures of the models in the rulebook (they can be seen on page 20 & 32). Once I'd seen the finished models things were a lot easier.
 
The larger of the two models went together easily once I'd figured out where everything went. I did have a problem working out which way round the tail went but another quick look at the photo sorted that out. I had problems with the smaller one though. Both arms were tricky to fit as they had to join together at the weapon (I think where they'd been connected to the sprue and the subsequent trimming didn't help matters). I had to glue and remove them a couple of times and in the end had to fudge things a little.
 
The finished models can be seen below with a Mantic Ghoul to give you a sense of their size.


The figures themselves are nice with lots of crisp detail and should paint up well. Hopefully, now I know to look for the models in the rulebook and to be careful trimming the parts, the rest of the models will go together quickly and easily.
 
Tune in tomorrow for the next random pack review.

Quick Unboxing: Deadzone Kickstarter Box

My Deadzone package arrived bright & early this morning so I thought I'd post a few quick photos of what I received.
 
Here's the contents of my package laid out on a 6x4 table.
 
The 2' x 2' rubber gaming mat

The counters are on nice thick card

Some of the figures with the rulebook in the background

Some of the scenery sprues. There are 4 different ones plus a sprue of connectors.
Also shown a couple of the faction decks and some D8's and bases

The contents of the actual Deadzone box. More terrain sprues, card decks and figures.
None of the figures are labelled so I'm not sure what I've actually got. But they are all in their on bags so as long as I only open and build one bag at a time I shouldn't have any problems. There's no instructions on how to put together the terrain with the connectors but I think there's a video of Ronnie assembling them somewhere. Also there's lots of terrain but there doesn't seem to be many connectors but that may just be because the terrain sprues look so big in comparison.

Of course there's still more stuff to come in the second wave next year. Who knows I may even have all this stuff assembled and painted by then.

Thursday, 28 November 2013

Deadzone on it's way!

Just had an e-mail saying my Deadzone Kickstarter stuff will arrive sometime tomorrow. I can't remember what I ordered so it will be fun opening up the box. Whatever it is it's heavy weighing in at 4.5kgs. I'll try and do a quick unboxing when it arrives. I think I got the pack shown below:


You may also like:

Related Posts Plugin for WordPress, Blogger...